Round Ring Schematic
Share
Round Ring Schematic
round ring
Materials:
To make this ring we will need:

1.50m of 0.20mm Nylon Thread (preferably a little thinner than 0.25mm since we have to pass the thread through the same bead several times)
A ring base with 7 rings (antique gold color)
2mm seed beads (“Amethyst” color)
18 Faceted 4mm (“Olivine” color)
12 Tupis 4mm (color «Olivine») 12 Tupis 4mm (color «Amethyst») 6 Tupis 4mm (color «Light Amethyst»)
Step 1:

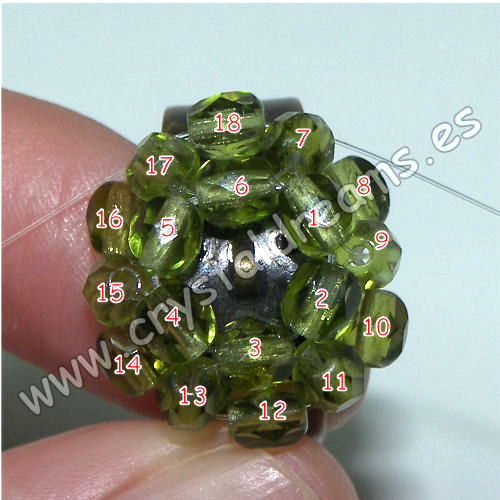
We will have to thread 6 faceted beads to the center of the thread and cross the ends of the thread through the last faceted bead (number 6).
Step 2:

Next we will have to cross the threads through one of the outer rings at the base of the ring.
Step 3:

Now we will cross the threads again through the last facet (number 6) and return to facet number 3 inserting the threads through the following facets (the thread on the right through facets numbers 1 and 2 and the thread on the left through facets numbers 5 and 4).
Step 4:

We will cross the threads again through faceted number 3 and then we will also cross them through the other outer ring of our ring base (the opposite one to the previous one).
Step 5:

Now we must bring the ends of the thread until they cross at facet nº1, to do this we will cross the threads again at nº3, the thread on the right will be passed through nº2 and nº1 and the thread on the left will be passed through nº4, nº5, nº6 and nº1.
Step 6:

Now it is a matter of forming squares in each of the first six facets. To form the first square that comes out of facet nº1 we will have to insert three new facets (nº7, nº8 and nº9) into the thread on the left and cross the threads in the last one (nº9).
Step 7:

For the second square we will pass the bottom thread through faceted bead #2 and in the top thread we will insert two new faceted beads (#10 and #11), crossing the threads through the latter.
For the third square we will pass the bottom thread through faceted bead #3 and in the top thread we will insert two new faceted beads (#12 and #13), crossing the threads through the latter.
Step 8:

Now we will have to repeat the same for facet #4 and #5.
We will only have to close the base of our ring by forming the square of faceted nº6, for which we will only have to add a new faceted (nº18) by the thread that comes out of faceted nº17 on the left; the thread that comes out on the right will be inserted through faceted nº6 and nº7 and we will cross the threads through faceted nº18.
Step 9:

In the next step we will have to cross the threads through facet nº7; to do this we will pass the thread on the left through facet nº7 and the thread on the right we will pass through facets nº17, nº6 and nº7.
At this point we will start making the flowers on the faceted ones. Before making this ring, it is recommended to practice with the 3-flower ring to understand how the flowers are made.
Step 10:

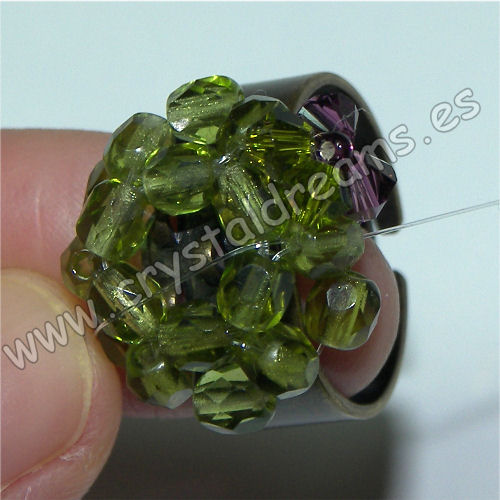
To make the first flower, we will have to insert a tupi into each end of the thread and cross the threads through a seed bead. In our case, we insert the “Amethyst” colored tupi into the thread on the left and the “Olivine” colored tupi into the thread on the right.
Step 11:

Next we will insert a tupi again through each end of the thread and cross the threads through facet #9.
Step 12:

Now we will repeat steps 10 and 11 five times, to complete the six flowers of our ring. We will finish with the threads crossing facet 7. We will now have to make the upper part of the ring.
Step 13:

To do this, we must cross the threads through facet nº6. To do this, we will pass the thread on the right through facet nº6 and the thread on the left through facets nº18, nº17 and nº6.
Step 14:

Now we will have to insert a tupi (in our case, the color “Light Amethyst”), a seed bead and another new tupi through the thread on the right. Once threaded, we will pass the thread through facet number 6 again.
Step 15:

Next we will thread a new tupi and a new seed bead along the thread on the right and we will put it back through the faceted beads no. 5 and no. 4.


We repeat Step 15 four more times until we have six central tupis with five seed beads.
Step 16:

We will make the thread come out through one of the tupis and we will thread the 6th seed bead. Now we will pass the thread a few times through all the central seed beads so that the ring is firm.
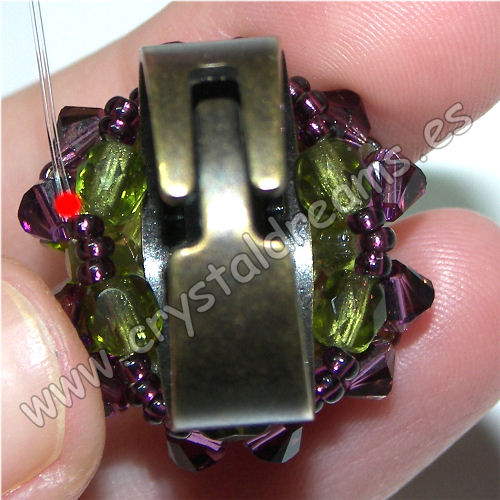
We will take the thread next to the other one that came out of faceted no. 6 and we will make the first knot that we will hide inside a tupi (red dot).
Step 17:

Now we will take the threads to the lower part of the ring making them come out through facets no. 7, no. 9, no. 11, no. 13, no. 15 or no. 17.
Step 18:

We will pass one of the threads through faceted beads no. 8, no. 10, no. 12, no. 14, no. 16 or no. 18 and we will finish off the ring by sewing seed beads along the entire lower edge between faceted beads no. 8, no. 10, no. 12, no. 14, no. 16 and no. 18.
Depending on the space left between each faceted bead, we will string 3 or 4 seed beads. We will make a few turns sewing the seed beads and the faceted beads together and we will finish by joining the threads and making a new knot (red dot).
Step 19:

Now we just have to hide the knot inside a tupi, also hide the threads between the facets and the tupis and cut the ends so that the thread is not visible.
Advice:
It is recommended to use threading needles to make the ring easier to make.
RESULT:


